.
God’s Masterpiece Set Options
.
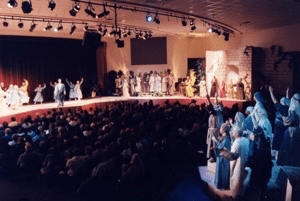
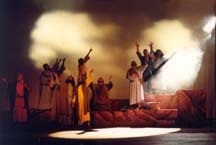
The set for God’s Masterpiece creates a sense of “invasive theater,” because it wraps around your whole audience and surrounds them with the action of this dynamic story of the life of Christ. Every man, woman, and child will be swept up in the energy of the performance, turning in all directions as the various scenes take place behind, beside, and in front of them!
![]() Download the “God’s Masterpiece Set Options”
Download the “God’s Masterpiece Set Options”
The Set For God’s Masterpiece Is:
Uncomplicated and inexpensive for the smaller church or group
You don’t need the fancy set you see in these photographs. All you really need are some platforms, draped in black fabric, decorated with silk plants and trees and scattered throughout your auditorium.
Expandable to a grand spectacle for the megachurch
Build Jerusalem and Calvary in your sanctuary. The limitless potential of God’s Masterpiece will grow along with your imagination!
Ideal for the Christian school
Equip the “young church” to tell His story year after year as the students grow up telling the story of the Gospel. Make God’s Masterpiece an annual event held in your school’s auditorium.
Below you will find descriptions of fourteen performance areas used in staging God’s Masterpiece. These fourteen areas involve eight distinct set pieces. Each set piece and the corresponding staging areas used there are described in their “simple” forms as well as in their and “elaborate” forms. Adapt this production to the physical layout of your performance facility or create an entirely new set of your own design. Have fun creating a “space” to tell the story of God!
The “Ideal” Set Design For God’s Masterpiece
This drawing shows the “ideal” set design for a larger auditorium. These are only suggestions. In the sections that follow, each of the set areas, marked with red numbers, will be discussed. Ideas will be given for staging God’s Masterpiece in smaller auditoriums throughout the various sections, as well.
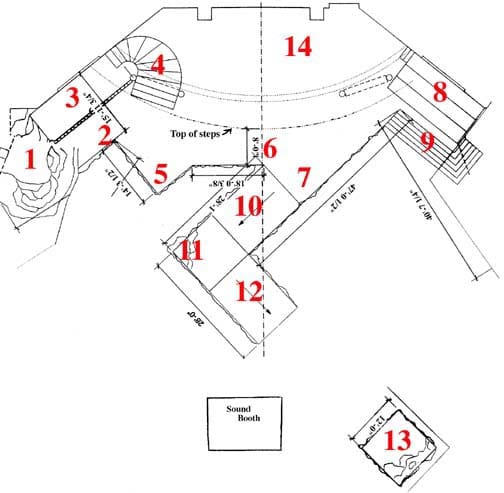
Area 1
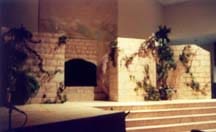
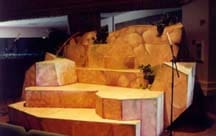
The Grotto
A multi-level playing space with an outdoor feel
“The Grotto” is the home of the Townspeople. They make all their comments from this location. It extends out from stage right, with some audience seated in front of it. It intersects with the stage at the furthest stage right point. Decorate it with silk ferns, flowers, and trees. This is where the outdoor scenes are portrayed, like Judas’ deal with the Pharisee’s etc. Be sure it can be ascended from the front, side and back, so people can enter and exit easily with minimal light.
Simple form: Use raised platforms, painted greenish/brown w/ silk plants
Elaborate form: Build a multi-level playing space, with sculpted rocks, and silk plants. Paint it greenish/brown; texture the rocks.
Areas 2, 3, 4
The Pharisees’ Tower
A vantage point for those who pass judgment
Area 2 – “The Landing” is the area at the base of the Pharisee Tower. This is where the Pharisees meet to engage Jesus and others.
Area 3 – “The Pharisee Tower” is the platform at the top of the tower where the Pharisees look down on the crowd. This is also the tower used by Pilate when he asks the fateful “Barabbas” question.
Area 4 – “The Pharisee Stairs” is where the Pharisees talk among themselves. It creates wonderful levels for artful stage pictures.
Simple form: Rent a painter’s scaffold and drape it with fabric to create a high playing space. Ascend to it by stacking platforms of various levels to create stairs. Or, use a balcony in your church to look down upon the crowd.
Elaborate form: Build a staircase to a tower with a playing space.
Areas 5, 6, 7
Downstage Edge
An intimate space for intense drama
Area 5 – “West Point” of the stage lip is the area at stage right. It is between the “Last Supper” table at center stage and the Pharisee stairs at up stage right.
Area 6 – “Upper Ramp” is the point at which the ramp extension into the audience intersects with the actual stage in the front of the sanctuary. It is the truest “center stage” point.
Area 7 – “East Point” of the stage lip is the area at stage left. It is between the “Last Supper” table at center stage and the tomb.
Simple form: Use the stage at the front of the sanctuary and slide “The Grotto” up to it.
Elaborate form: Extend your stage with platforms that create a distinct “East and West Point.”
Areas 8, 9
The Tomb
A desolate cave
Area 8 – This is where the body of Christ is laid to rest. Make a rolling stone that slides over it so that this playing space can be used for another “outdoor scene.” Decorate it with climbing vines and palms.
Area 9 – Surround the tomb with stairs, leading up to it from the audience. The Witnesses gather here to make their comments.
Simple form: Use the baptistery in your church to create a “cave-like” space. Surround it with painted fabric to simulate rocks. Make a rolling canvas-covered rock to cover the space. Slide platforms of various heights up to the opening to create the stairs.
Elaborate form: Build a façade around the baptistery of plywood with painted bricks on it. Make a huge stone that actually rolls, out of plywood. Create actual stairs that ascend to the tomb.
Areas 10, 11, 12
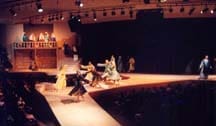
The Ramp
A way to “invade” the audience with the action of the play
This is an eight-foot wide ramp, extending out into the audience that makes it possible for the action of the play to slice right into the center of the audience. The ramp curves at an elbow and cuts through the audience again at a different angel. The length of the ramp will vary according to the constraints of your facility, but the effect is well worth it. This is where the “Garden of Gethsemane is located, where Jesus is arrested, where the “Life of Christ” scenes take place. It is where the children run to meet Jesus, and it is the centerpiece for the dancers at the entrance of Jesus at the “Triumphal Entry.”
Area 10 – “The Middle Ramp” is the area between the intersection point with the main stage and the elbow, which becomes Gethsemane.
Area 11 – “Gethsemane” is at the elbow of the ramp. It has several rocks piled there, with a vine growing around the rocks. This is where Jesus prays and where He is arrested.
Area 12 – “The Lower Ramp” is the end of the ramp that tapers down to audience level so the players can ascend the ramp from the audience.
Simple form: Do not build an elevated ramp, simply leave a wide aisle that slices through the audience in two directions, with an elbow in the center. Use it as a playing space for the various scenes.
Elaborate form: Build an elevated stage, 8 ft. wide, that slices through your audience, with an elbow at the turn. Create faux rocks at “Gethsemane.”
Area 13
The Island
A multi-layered playing space behind the audience
“The Island” is located at the back of the audience, near the back wall of the building, with audience members seated between it and the point at which the ramp begins to ascend from out in the house. Leave enough space for players to clear the island before they ascend the ramp. Decorate the island with a few crawling vines and silk plants. Paint it greenish/brown for an outdoor feel.
Simple form: Stack platforms of various heights together, paint or drape them with camouflaged or painted fabric.
Elaborate form: Build the multi-layer space like a huge rocky island. Paint on faux rocks.
Area 14
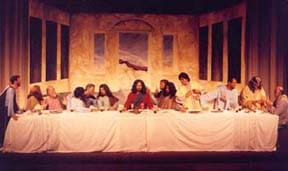
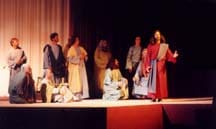
The Upper Room (on main stage)
The central picture for the first act
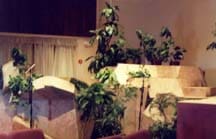
This scene of the play takes place on the main stage at center. Seven disciples get up from the table and take part in the re-creation of scenes from the life of Christ, which they narrate. Paint a replica of the backdrop from the painting and hang it behind the table. Ideally, you will have a curtain that you can open and close each time a new “life of Christ” scene is enacted, so the players at the table do not have to sit still for 45 minutes!
Simple form: Drape the front of the stage with cloth, set the table in front of the cloth, use lighting to create dimension. Do not paint the backdrop.
Elaborate form: Build a “Last Supper Table” that folds up and rolls away. Paint the backdrop, install a curtain rigging that will open and close as each disciple gets up from the table and returns to it.
Area 14
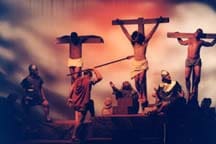
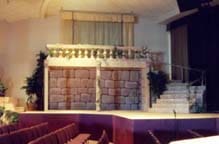
Calvary (on main stage)
The mount with three crosses
Close the curtain on the main stage, move the “Last Supper” table out of the way, and roll in the platforms that create “Calvary.” Use the same playing space at center stage. In three of the platforms make holes that will hold the crosses up. Make the crosses hollow, so they will not be so heavy. Attach bicycle seats to the crosses at the places where the men hanging on them need to have them. Attach foot rests at the base of the crosses and hand grips at the top, so their arms can slide through and their hands can grip to support the upper body. Paint the platforms to look like rocks.
Simple form: Gather platforms of various heights together. Build three VERY sturdy, heavy ones to support the crosses and the weight of the men.
Elaborate form: Build several HEAVY rolling platforms that slide and clamp together to form Calvary. Weld metal frames to hold the crosses in place.
Area 14
The Ascension (on main stage)
The Calvary mount without crosses
Leave “Calvary” in place, but remove the crosses. This will make it look like a hill on stage. Jesus and His disciples will walk up this hill for the closing ascension scene.
Simple form: (Same as “Calvary,” without the crosses)
Elaborate form: (Same as “Calvary,” without the crosses)